Creative Landscapes
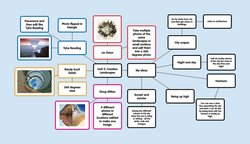
I have chosen Creative Landscapes as my Unit 2 question because I really like the work of Tyhe Reading and Liam Wylie. I like how they both edit the images into something more interesting that a boring landscape. Out of my three top questions this is the one that I want to expand into a project. I think it will be a fun question to do as I get to play around in Photoshop trying new things, and expanding my horizons. I can make this project personal as I can use silhouettes of things that mean a lot to me when editing out the middle. I am really excited to start this and I have a lot of basic ideas which are going to grow into something bigger and better for my final piece. All my ideas are portrayed in a mind map.


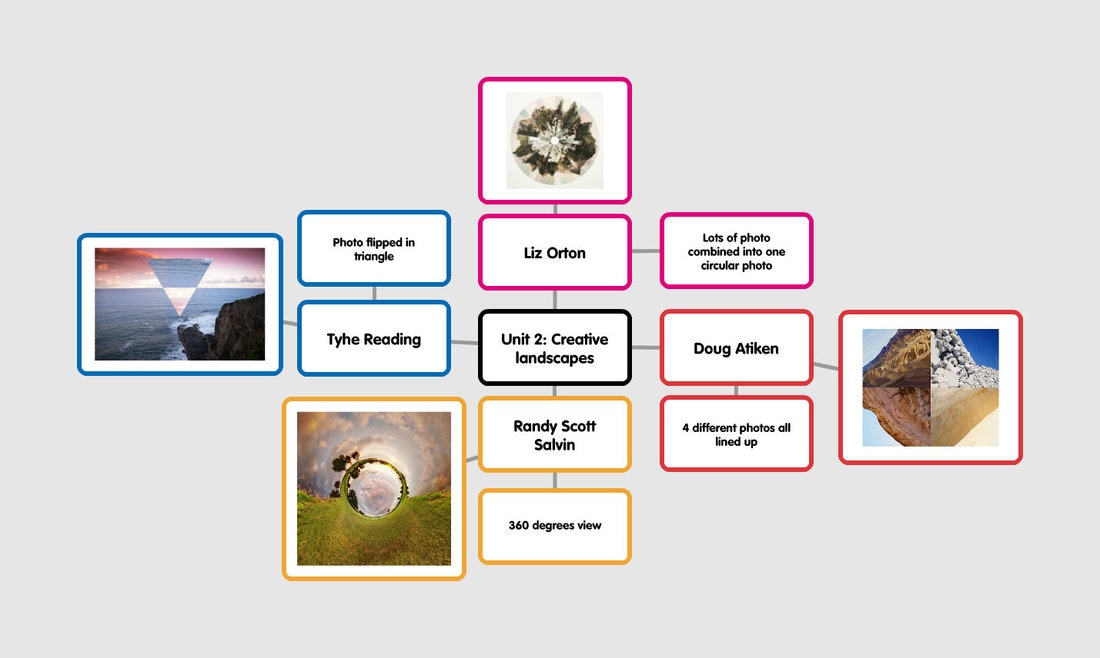
Creative landscapes mindmap of ideas
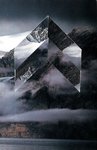
Liam Wylie - Wylie has edited this image using the same image in the middle just at different angles. This is clever because although there is no other image, it looks like there is. He would've took the photo normally and cut sections out and moved them around using Photoshop.
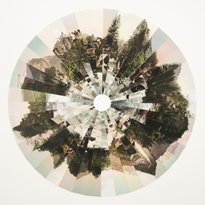
Liz Orton - This photo is made up from approximately 40 images. These images are all of similar things (trees) and are edited to make a round image in which all the trees match up. The image looks very creative and is a good twist on landscapes.
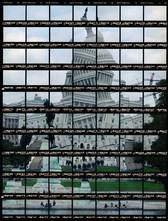
Thomas Kellner - Kellner takes a photo section by section changing the angles. When he puts them all together in a joiner formation some of the photos don't match up and are wonky. This image is of the White House in America, and as you can tell none of the pieces match up perfectly. This puts a twist on normal landscapes and makes them look distorted
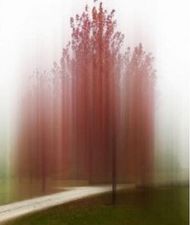
Ellen Jantzen - Jantzen takes a photo of a normal image and adds a motion blur to it. This makes the images, in this case a tree, look as if it is moving. This makes the image look distorted and different to other regular images
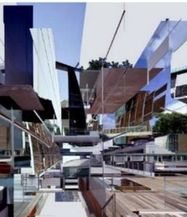
Benjamin Maus- Maus also does a joiner styled image. All his photos over lap and give off quite a confusing image. It is quite hard to tell what everything is supposed to be. It gives off an abstract vibe.
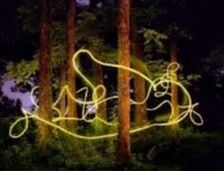
Barry Underwood - Underwood uses light trails in his images. The photo is taken in a forest with light trails weaving in and out of the trees
|
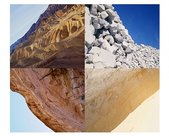
Doug Atiken - Atiken has taken 4 photos from 4 very different surroundings and has edited them in a square formation where all of the lines meet. It makes the photo merge together although all the images are different.
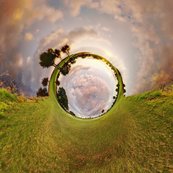
Randy Scott Slavin - This image looks like a portal to another world. The photo is in a complete loop and was either done on Photoshop or using a certain type of lens
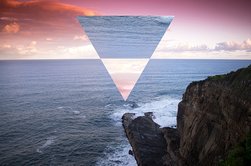
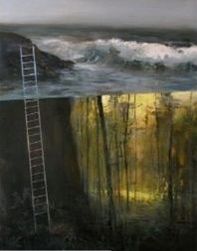
Thye Reading - Reading takes a landscape photo which has two colours contrasting in it. He then uses a geometric shape and flips the image. In this case he uses a triangle to flip the sky into the sea, and sea into the sky. This adds a twist on normal landscapes and makes them more quirky then normal.
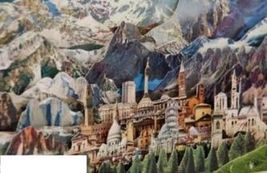
Caterina Rossato - Rossato cuts her landscape out of paper/card. The little statues are organised so it looks like a landscape. This adds a twist and makes everything look different.
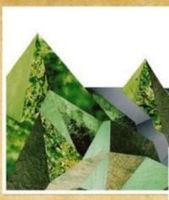
Liesl Pfeffer - The image looks like geometric shapes in the formation which looks like a mountain. It looks as though it was done on a software and not actually taken as an image
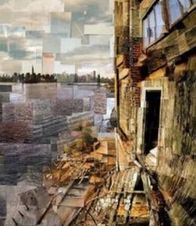
Chris Soria - This is a joiner that has been put together. The little images are photos of certain colours which make the image. The photos that were actually taken weren't landscapes they were just regular images.
|
Moodboard of Ideas


Critical Analysis: Liam Wylie
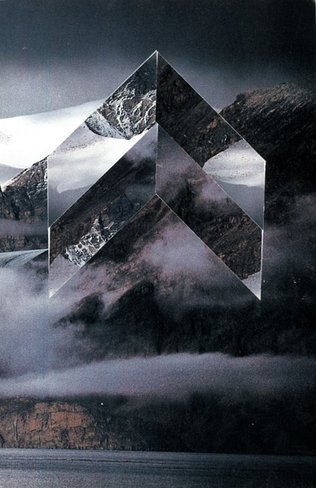
Liam Wylie is based in Toronto and has a bachelor degree in fine arts. This photo comes from a group of photos called "Collages". Each photo is a landscape with the same photo in the middle but in another shape - in this case arrows.
This photo is of a cliff face with fog around it and water below, in the middle of the photo there are two upwards arrows displaying parts of the picture. This makes the photo look more complex and more creative. The photo is dull and are all greyish colours. The title of the photos as a whole is "Collages" which does link with the photo. A collage is a piece of work made up with other parts, and this photo has parts repeated in the middle.
This photo was took normally and then edited together on Photoshop. The photo must have been taken on a boat as you can see the sea. Wylie must've been in the middle of the sea to catch this photograph. It uses the formal elements of colour, texture and composition. The colours all go together and makes it look more mysterious and put together. You can clearly see the texture of the rocks and the fog which shows a lot of detail. Your attention gets drawn towards the arrows in the middle because of the lines and the colour contrast.
This photo gives of quite an eerie vibe and the fog makes it seem in the middle of nowhere. I like how the arrows in the middle make it look distorted and different from normal landscapes. The photo without any editing will be quite bland but this makes it more interesting.
I think Reading created photographs like this to make a plain landscape a bit more creative. From a normal photo of a cliff, which anyone can take a photo of, to a unique new photograph. I'm going to do a similar concept to editing the same photo in the middle of the photo. I am going to take photos of landscapes with a clear contrast between the land and sky. I will then edit the photos similar to Reading.
Updated Mindmap
Shoot 1


WWW: There is a clear contrast in colours.
The photos are all in focus
EBI: The panoramas didn't dip or change colour
NEXT STEPS: Edit these photos in the style of Reading
Do a shoot in another location
The photos are all in focus
EBI: The panoramas didn't dip or change colour
NEXT STEPS: Edit these photos in the style of Reading
Do a shoot in another location


WWW: Can clearly tell I've been inspired by Reading and Wylie.
EBI: The shapes are exactly central
Smooth outlines
NEXT STEPS: Carry on using geometric shapes but experiment more
EBI: The shapes are exactly central
Smooth outlines
NEXT STEPS: Carry on using geometric shapes but experiment more
Peer Critique
I like how you took a range of landscapes at different angles and in some photos it looks like you have used a fish eye lens. The clear colour contrast between the sky and grass will make the photo shopping easier. This is a good, clear start to your project and can be easily developed. It is clear you are inspired by your photographer you have looked at.
For your next shoot you could take photos of city landscapes instead of country landscapes. This will expand your horizons and make your project develop further.
Next you should carry on photo shopping Shoot 2 photos in the style of your desired photographer.
Shoot 2


WWW: The photos are all in focus
EBI: The photos weren't as dark and dull
They shoot wasn't done in school
NEXT STEPS: Edit this shoot
Do another shoot which will develop my ideas
EBI: The photos weren't as dark and dull
They shoot wasn't done in school
NEXT STEPS: Edit this shoot
Do another shoot which will develop my ideas
Photoshopped versions


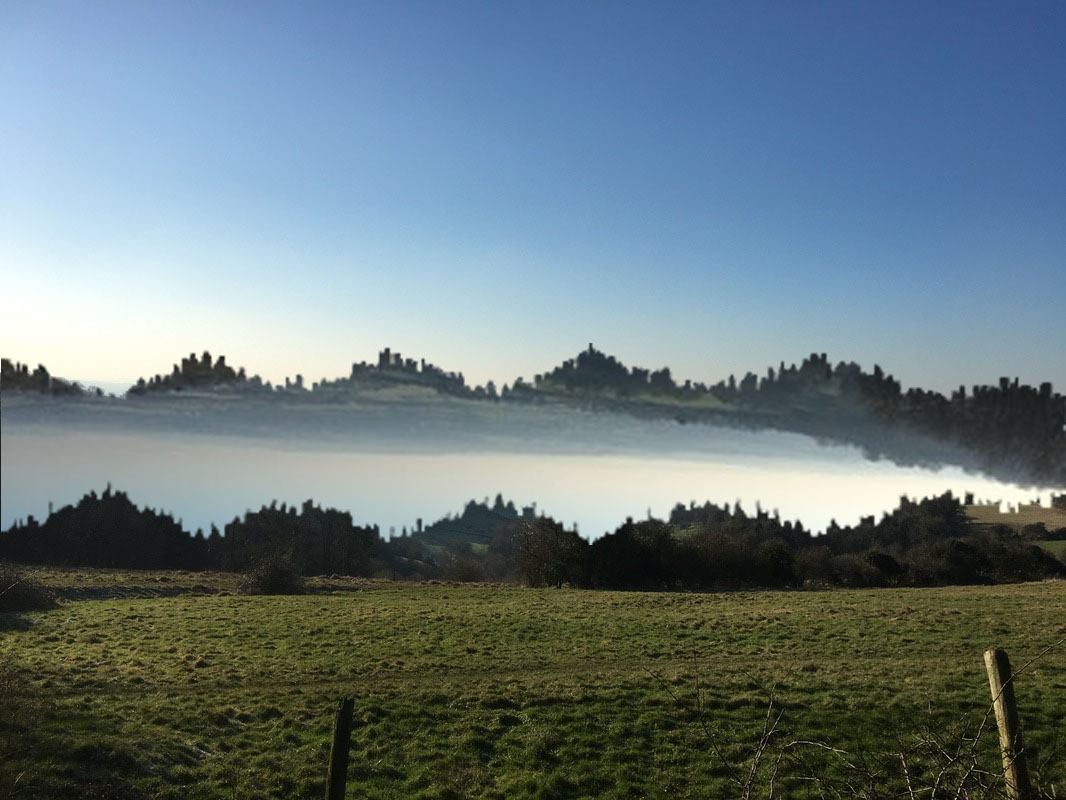
WWW: I experimented more with geometric shapes
EBI: The pictures were clearer
NEXT STEPS: Use different shapes
EBI: The pictures were clearer
NEXT STEPS: Use different shapes
How I photoshop my images:
Will Pearson - Critical Analysis

Will Pearson is from London who takes panoramic photos. He takes panoramas of cityscapes in which you can see the sky and the buildings. He mostly enjoys taking photos of London and other well-known cities as he likes to travel. Each of his photographs are taken from a height so everything can be included in the pictures.
This photo was taken in London on the top of the Shard, 310 meters in the air. The photo includes the city of London at night filled with lights from the buildings. The contrast between the glow of the lights and the dull city catches my attention. The sky and the river are similar colours which make the middle bit, the city, stand out more as it's against a dull background.
I really like Pearson's work and especially this photograph. Taking photos from a height make sure everything gets included in the photo. I like how you can see the river, the city either side and then the sky.
I have looked into the work of Pearson because I'm going to start taking City shapes and panoramas to expand my ideas. I have took panorama in previous shoots but they've been in country side. I will take my photos like Pearson does but edit them like Wylie.
Shoot 3


WWW: All photos are in focus
My project has developed into another setting
EBI: There isn't a clear colour contrast as the water is kind of green.
NEXT STEPS: I will start editing my photos using musical symbols not geometric shapes. This makes it more meaningful to me as music is a big part of my life. I will do another shoot focusing on the city.
Edits


WWW: I got a theme of using musical symbols into my edits which means something to me
EBI: The symbols weren't just random things to do with music
NEXT STEPS: Experiment using soundwaves of my favourite songs
EBI: The symbols weren't just random things to do with music
NEXT STEPS: Experiment using soundwaves of my favourite songs
Shoot 4


WWW: There is a clear divide between the sky and the buildings.
I like how you can see the tops of the buildings along the whole bottom of the photo and that there is nothing in the sky.
EBI: The sky is brighter because it is quite dull it makes the whole photo seem quite dull. It makes the photo merge together.
NEXT STEPS: Carry on editing using musical symbols.
Do another shoot but makes sure the colour contrast is very clear.
Editted photos


WWW: The edits using sound waves came out as I wanted them to
EBI: The lines weren't so sharp and jagged.
NEXT STEPS: Research a photographer that uses soundwaves and edit like that person
EBI: The lines weren't so sharp and jagged.
NEXT STEPS: Research a photographer that uses soundwaves and edit like that person
Final piece ideas

Anna Marinenko


Anna Marinenko is a Ukrainian designer. She has done a symbolic and visual connection between noise and nature. Marinenko saw the similarity between mountains, trees and skylines and the sound waves of music. She has made a series of photographs which compares two different images side-by-side, matching them together into one single image.
The images are half a landscape and half sound wave, which merge together very nicely. The landscape turns into the sound wave which match the peaks perfectly. It makes it look like all one photo which is very clever.
Below are 4 edits I done keeping Marinenko's work in mind. The edits went okay but the sound waves aren't as clear as I wanted them to be.
Anna Marinenko Edit


WWW: Clear inspiration by Marinenko
EBI: The soundwave stood out more against the blur
NEXT STEPS: Experiment more with soundwaves
EBI: The soundwave stood out more against the blur
NEXT STEPS: Experiment more with soundwaves
10 hour exam plan
Hour 1: Critical analysis/upload any photos
Hour 2: Edit any photos
Hour 3: Edit photos
Hour 4: Edit photos
Hour 5: Choose photos i want to use for final piece
Hour 6: Print off the photos
Hour 7: Stick them all down on card
Hour 8: Take photos of my final piece and upload
Hour 9: Do a conclusion on my website
Hour 10: Make sure everything is on website
Shoot 5


WWW: The photos are in focus
There is a clear colour contrast
EBI: I took more panoramic photos as most of these are standard images
NEXT STEPS: Edit using sound waves of my favourite songs in the style of Reading and Marinenko.
There is a clear colour contrast
EBI: I took more panoramic photos as most of these are standard images
NEXT STEPS: Edit using sound waves of my favourite songs in the style of Reading and Marinenko.
Edits


WWW: I experimented with flipping soundwaves upside down not around.
EBI: Experimented more with the blurring of the backgrounds
NEXT STEPS: Edit my final shoot thinking of my final piece
EBI: Experimented more with the blurring of the backgrounds
NEXT STEPS: Edit my final shoot thinking of my final piece
Shoot 6


WWW: The photos have a clear colour contrast between sky and sand.
I like how you can see the suns reflection bouncing off the sea in some of the images
EBI: Majority of the photos are quite pixely
Panoramas have warped and bent.
NEXT STEPS: Record my own soundwaves of nature (sea, animals, rain).
Edit my final piece
I like how you can see the suns reflection bouncing off the sea in some of the images
EBI: Majority of the photos are quite pixely
Panoramas have warped and bent.
NEXT STEPS: Record my own soundwaves of nature (sea, animals, rain).
Edit my final piece


WWW: I like how the soundwaves look when flipped diagonally, I will consider this in my final piece
EBI: Tried different angles, with different distortions on the background
EBI: Tried different angles, with different distortions on the background
Sound waves


I recorded these sound waves of nature noises. I went to Lyme Regis on the weekend and I recorded the sounds of waves, rain, animals and then screenshotted the sound waves they made. These soundwaves will be editted onto photos from previous shoots to get my final piece.
Final Piece Edits


WWW: All the edits lined up with the line in the original photo.
EBI: The beach ones weren't pixely
NEXT STEPS: Create a final piece and supporting piece using these edits.
EBI: The beach ones weren't pixely
NEXT STEPS: Create a final piece and supporting piece using these edits.
Final Piece Ideas


Final Pieces
|
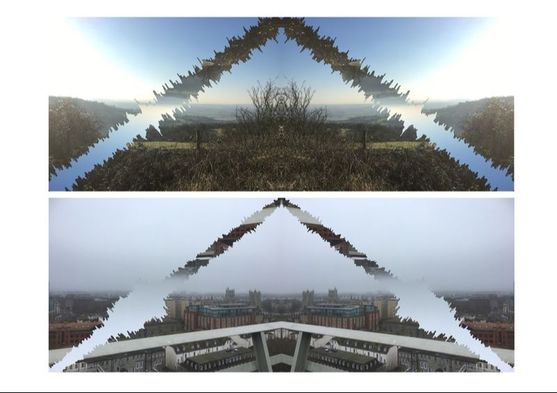
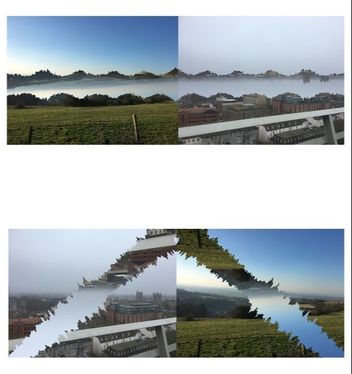
On the left is my final piece for Creative Landscapes. I used these two photos because I love being outside and high up. The two photos are very contrasting, as one is in the country side and is all bright, and the other is in the city and is quite dull. However, I like both places equally as much. The photo is perfectly symmetrical down the middle, as both sides are the exact same, just flipped round. The sound waves are of the noises that could be heard in that location. For example, the city wave is of cars, and the country wave is of the birds and the wind. Overall I am very pleased with my final outcome and it came out as well as I hoped it would.
|
|
To the left are my two supporting images for Creative Landscapes. The photos are the same which are used in my final piece. The reason why the soundwaves follow on in each photo is because they are two of my favourite places and I wanted to show them intertwined. The sound waves on these two photos are off two of my favourite songs. I used the soundwaves of my favourite song because I wanted to include something else I love in the photo. This makes the photo more meaningful as it is three things that mean something to me.
|
Evaluation
I selected Creative Landscapes for my Unit 2 project because I enjoyed the work of Liam Wylie and Tyhe Reading. I have truly enjoyed doing this question as I got to experiment with different photo shopping techniques and go to different locations to take the photos. I started off the project looking into the works of many Creative Landscapes photographers but decided to further explore the work of Liam Wylie. I realised he used geometric shapes to edit his photos, so I would edit my first shoot in a similar way to how he does.
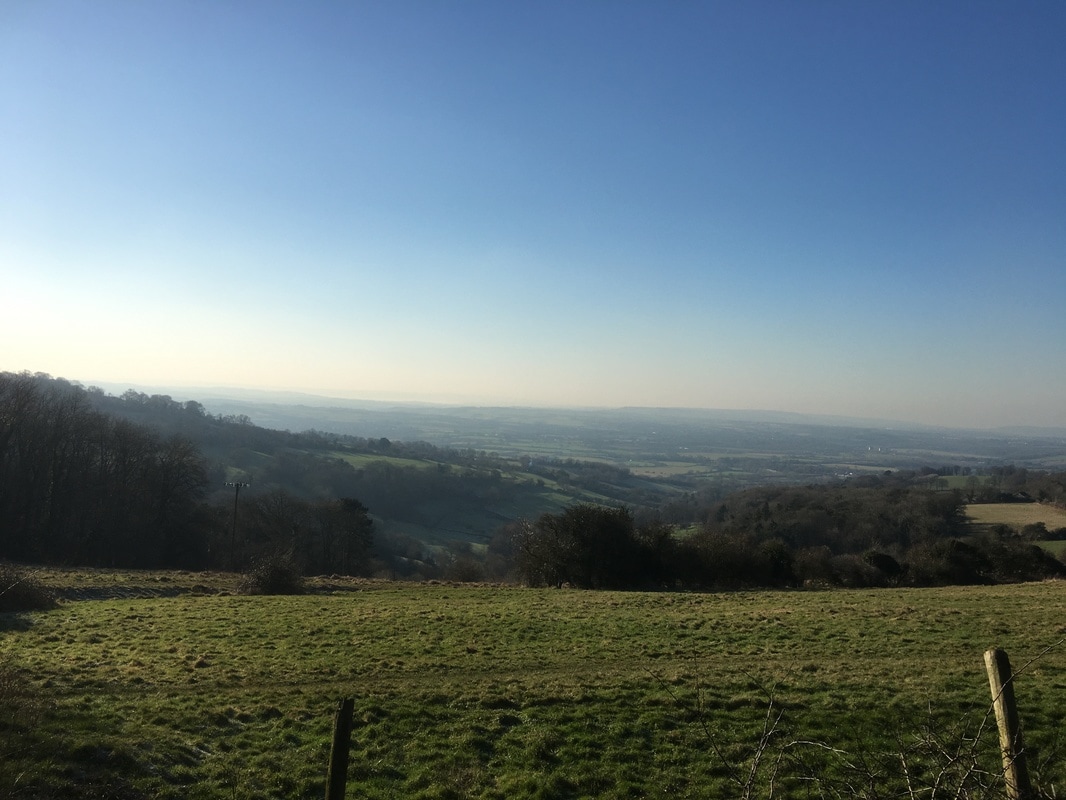
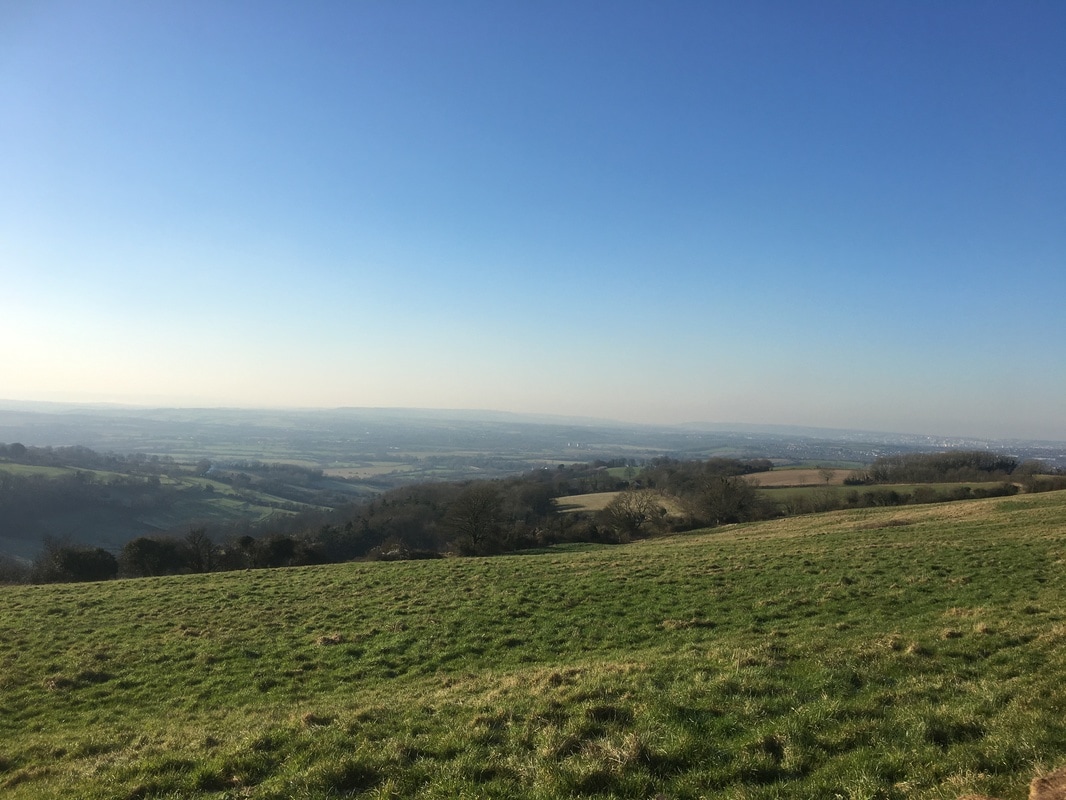
My first shoot was done in Landsdown and was looking over the country side. I was pretty pleased with my first shoot as you could see a clear contrast in colours so it would be easy to edit. Some of the photos dipped and warped because I was taking panoramas, but apart from that all the photos were in focus and good. I then started editing these photos on Photoshop in the style of Wylie. I used geometric shapes to start with, such as triangles, circles and diamonds. I then started to use silhouettes of other objects, like a teddy bear and a flower. I liked these edits, but they weren’t significant to me so I needed to think of a way to make it more personal.
Shoot 2 was done in school and I didn’t like this shoot. It was an experimental shoot to help me practise photo shopping in different ways. The photos were too dark and dull and the environment they were took in wasn’t a pretty place. I carried on editing these shoots with triangles and circles, just to get the hang of the editing.
I then started looking into another photographer called Will Pearson, who takes scenic panoramas. His work caught my eye as they are all looking over things, and is a different kind of photo. I wanted to look more into different types of photos to expand my project into different photos. Although I had already done some panoramas I would focus more on them.
Shoot 3 was done in Keynsham by a river as I wanted to include some water into my project. My project has now further developed into another location, away from the country side and each shoot I will do will be in another place. I decided to use musical symbols when editing instead of geometric shapes. I done this because music is a big part of my life as I always listen to it and helps me with a lot of things. I used musical notes, instruments and shapes like the stop/play button. Using musical symbols has led me onto do more things with my project and made it more about me.
My 4th shoot was done on top of a car park in town. These photos are looking down on Bristol and all the buildings. This shoot is personal to me as I was born and brought up in Bristol and I really enjoy going there. I started using generic sound waves when editing my photos as it was something different than a piano or guitar. These edits were my favourite and I decided this is going to be my main topic when I’m editing. The sound waves almost looked as if the photo was dripping and it gave it a cool effect.
I then critically analysed a photographer called Anna Marinenko. Marinenko’s work incorporated soundwaves following on from normal images. I thought her work was really fascinating and I wanted to try editing like she does. My Marinenko inspired edits didn’t come out as well as I liked because the blurred background didn’t make the soundwave stand out as much as I would have liked it to have done.
In the Easter break I went away to Newquay where I conducted two more shoots on the beach. I really enjoyed taking these shoots as the location was so nice. Shoot 5 was all in focus and the images had a very clear colour contrast, but I didn’t take many panoramic images. Shoot 6 was okay, but some of the photos have are pixelated and fuzzy. I took more panoramas on this shoot but they warped and dipped in the middle because it was windy.
My edits for shoot 5 experimented with flipping the photo upside down. I tried one inspired by Marinenko but the soundwave wasn’t that clear against the background. I like the images of the soundwave flipped and I will consider that when putting together my final piece. Shoot 6 edits experimented with doing the soundwaves diagonally and these were some of my favourite edits I’ve done. I especially liked the beach one as it lined up perfectly. I definitely knew I was going to include diagonal edits in my final piece.
I had an app on my phone that let you record sounds and upload the soundwaves onto my website. I went to Lyme Regis for the weekend and filmed some noised there. I filmed the sound of some waves, talking, and rain. The fact I filmed all the noises myself makes it more personal to me because I didn’t just get the sound waves of Google.
In my 10 exam I spent approximately 3 hours on the first editing photos which could be used in my final piece. I picked my 3 best shoots and edited photos from each one. This gave a range of photos which I could possibly use. Some of the edits looked better than others and they were the ones I was going to edit together to get my final piece.
I then spent the remaining 2 hours to edit together some final piece ideas. I found my favourite edits from the first few hours and thought of some ways to try incorporate them all together. I used Photoshop to try get my final piece using photos from shoot 1, 4 and 6. This gives a range of places which I like to visit. Each place is different aswell – country, town and beach. On my supporting images the soundwaves are from my favourite song. I used the soundwaves of my favourite song because it shows my favourite place and song. This adds a story behind my supporting image and not just a soundwave I found of Google. I decided with 4 images, 2 for my final and 2 supporting. I am pleased with my final piece as they merge together and line up perfectly.
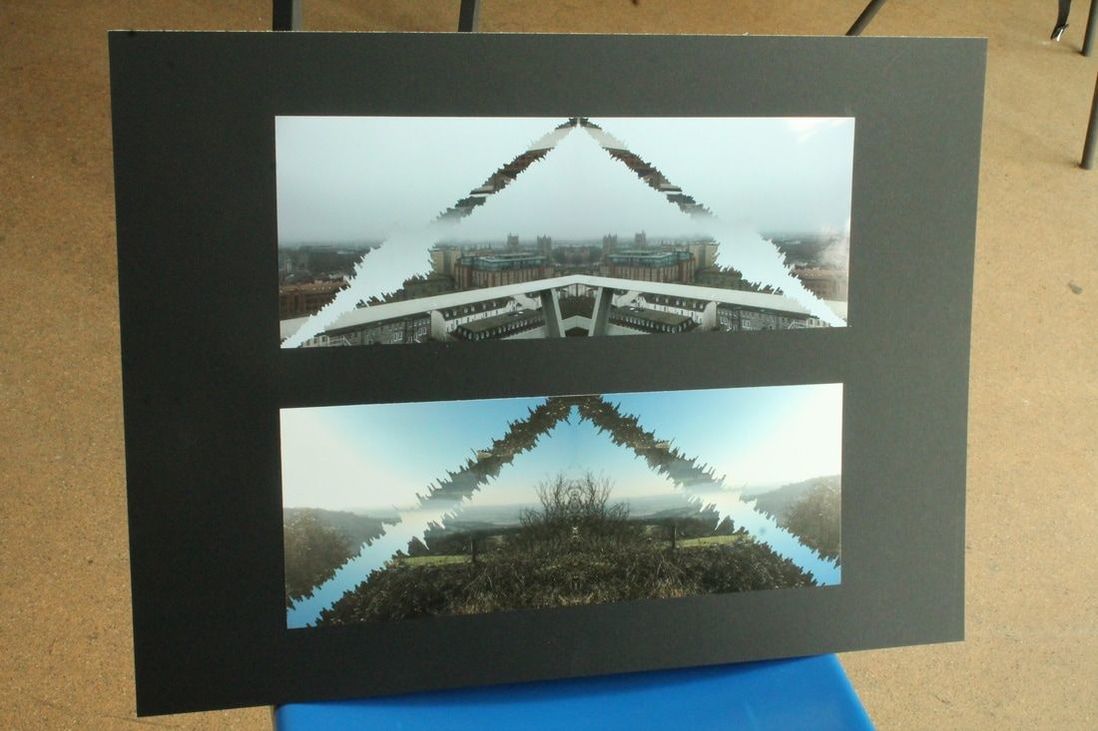
On my second day I spent 1 hour perfecting my final pieces making sure everything was how I wanted it to be. I then printed all my pieces. I cut my final piece into two separate images and mounted them on some black card, as equally as possible. I chose black because it brings out the colours in the country side image and makes the city one stand out a bit more than white would.
Once I had finished printing and mounting I then went through my Unit 2 page and made sure everything was on it following Mr Corkish’s checklist. I added a critique to every shoot and edits I have done and said what I’m going to do next which makes the project flow. Doing that shows what I thought of before I done each shoot and showed my planning ahead. I added anything that I have left out – such as an analysis of some photographers in my question. I went through and checked spelling, punctuation and grammar to make sure everything is perfect.
I have really enjoyed this project as it is very personal towards me. The photos are all where I enjoy going and the soundwaves are also special to me. The fact it is my own recordings for the final piece make it more unique as these soundwaves are nowhere else online. The project went exactly how I wanted to go with not very many setbacks or faults. My final piece is even better than I imagined it would be which is very positive. I am very glad that I chose this question because all round I really enjoyed this Unit.
My first shoot was done in Landsdown and was looking over the country side. I was pretty pleased with my first shoot as you could see a clear contrast in colours so it would be easy to edit. Some of the photos dipped and warped because I was taking panoramas, but apart from that all the photos were in focus and good. I then started editing these photos on Photoshop in the style of Wylie. I used geometric shapes to start with, such as triangles, circles and diamonds. I then started to use silhouettes of other objects, like a teddy bear and a flower. I liked these edits, but they weren’t significant to me so I needed to think of a way to make it more personal.
Shoot 2 was done in school and I didn’t like this shoot. It was an experimental shoot to help me practise photo shopping in different ways. The photos were too dark and dull and the environment they were took in wasn’t a pretty place. I carried on editing these shoots with triangles and circles, just to get the hang of the editing.
I then started looking into another photographer called Will Pearson, who takes scenic panoramas. His work caught my eye as they are all looking over things, and is a different kind of photo. I wanted to look more into different types of photos to expand my project into different photos. Although I had already done some panoramas I would focus more on them.
Shoot 3 was done in Keynsham by a river as I wanted to include some water into my project. My project has now further developed into another location, away from the country side and each shoot I will do will be in another place. I decided to use musical symbols when editing instead of geometric shapes. I done this because music is a big part of my life as I always listen to it and helps me with a lot of things. I used musical notes, instruments and shapes like the stop/play button. Using musical symbols has led me onto do more things with my project and made it more about me.
My 4th shoot was done on top of a car park in town. These photos are looking down on Bristol and all the buildings. This shoot is personal to me as I was born and brought up in Bristol and I really enjoy going there. I started using generic sound waves when editing my photos as it was something different than a piano or guitar. These edits were my favourite and I decided this is going to be my main topic when I’m editing. The sound waves almost looked as if the photo was dripping and it gave it a cool effect.
I then critically analysed a photographer called Anna Marinenko. Marinenko’s work incorporated soundwaves following on from normal images. I thought her work was really fascinating and I wanted to try editing like she does. My Marinenko inspired edits didn’t come out as well as I liked because the blurred background didn’t make the soundwave stand out as much as I would have liked it to have done.
In the Easter break I went away to Newquay where I conducted two more shoots on the beach. I really enjoyed taking these shoots as the location was so nice. Shoot 5 was all in focus and the images had a very clear colour contrast, but I didn’t take many panoramic images. Shoot 6 was okay, but some of the photos have are pixelated and fuzzy. I took more panoramas on this shoot but they warped and dipped in the middle because it was windy.
My edits for shoot 5 experimented with flipping the photo upside down. I tried one inspired by Marinenko but the soundwave wasn’t that clear against the background. I like the images of the soundwave flipped and I will consider that when putting together my final piece. Shoot 6 edits experimented with doing the soundwaves diagonally and these were some of my favourite edits I’ve done. I especially liked the beach one as it lined up perfectly. I definitely knew I was going to include diagonal edits in my final piece.
I had an app on my phone that let you record sounds and upload the soundwaves onto my website. I went to Lyme Regis for the weekend and filmed some noised there. I filmed the sound of some waves, talking, and rain. The fact I filmed all the noises myself makes it more personal to me because I didn’t just get the sound waves of Google.
In my 10 exam I spent approximately 3 hours on the first editing photos which could be used in my final piece. I picked my 3 best shoots and edited photos from each one. This gave a range of photos which I could possibly use. Some of the edits looked better than others and they were the ones I was going to edit together to get my final piece.
I then spent the remaining 2 hours to edit together some final piece ideas. I found my favourite edits from the first few hours and thought of some ways to try incorporate them all together. I used Photoshop to try get my final piece using photos from shoot 1, 4 and 6. This gives a range of places which I like to visit. Each place is different aswell – country, town and beach. On my supporting images the soundwaves are from my favourite song. I used the soundwaves of my favourite song because it shows my favourite place and song. This adds a story behind my supporting image and not just a soundwave I found of Google. I decided with 4 images, 2 for my final and 2 supporting. I am pleased with my final piece as they merge together and line up perfectly.
On my second day I spent 1 hour perfecting my final pieces making sure everything was how I wanted it to be. I then printed all my pieces. I cut my final piece into two separate images and mounted them on some black card, as equally as possible. I chose black because it brings out the colours in the country side image and makes the city one stand out a bit more than white would.
Once I had finished printing and mounting I then went through my Unit 2 page and made sure everything was on it following Mr Corkish’s checklist. I added a critique to every shoot and edits I have done and said what I’m going to do next which makes the project flow. Doing that shows what I thought of before I done each shoot and showed my planning ahead. I added anything that I have left out – such as an analysis of some photographers in my question. I went through and checked spelling, punctuation and grammar to make sure everything is perfect.
I have really enjoyed this project as it is very personal towards me. The photos are all where I enjoy going and the soundwaves are also special to me. The fact it is my own recordings for the final piece make it more unique as these soundwaves are nowhere else online. The project went exactly how I wanted to go with not very many setbacks or faults. My final piece is even better than I imagined it would be which is very positive. I am very glad that I chose this question because all round I really enjoyed this Unit.
